视频讲的很详细,自己写给自己
微服务架构 应用项目拆成一个个微服务(一个个业务),服务之间用HTTP、RPC或者其他协议进行通信
背景:一开始一个war就能跑起来,但是一台机子承载能力有限,所以项目分开放。数据库放在一台机子,另外一个应用放在另外一台机子。
all in one是指所有服务封装在一个应用中。它的好处是易于开发和测试方便部署。坏处是修改项目需要停掉服务,重新打包。
微服务打破all in one方式,把每个功能独立出来,修改一个不影响其他的
去中心化,每个服务可以用不同语言编写
微服务架构必然会产生分布式
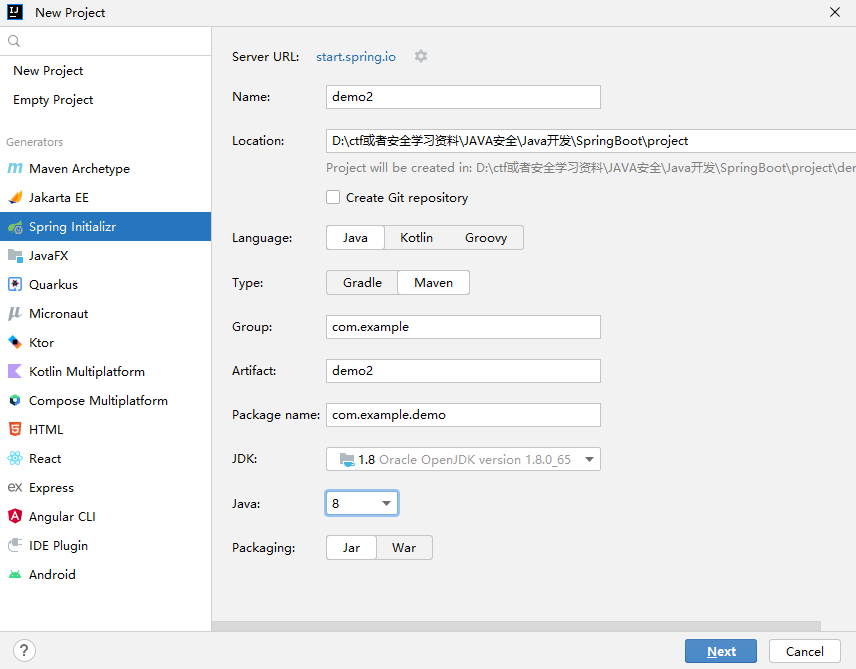
HelloSpringBoot 开始 在IDEA里面创建
选择SpringWeb依赖即可
最后点击创建
看看大概这个项目
main/java文件夹下面有个默认的类
1
2
3
4
5
6
7
8
@SpringBootApplication public class Demo2Application {public static void main (String[] args) {
application.properties是springboot的配置文件
test/java里面有单元测试类
在项目程序主类同级目录下,新建一个controller包
新建一个控制器
1
2
3
4
5
6
7
8
9
10
11
12
13
14
15
16
17
18
19
20
21
22
package com.example.demo.controller;import org.springframework.web.bind.annotation.RequestMapping;import org.springframework.web.bind.annotation.RestController;@RestController public class HelloController {@RequestMapping("/hello") public String hello () {return "hello springboot" ;@ResponseBody @Controller public class HelloController {@RequestMapping("/hello") public String hello () {return "hello springboot" ;
看看主类中的@SpringBootApplication源代码
1
2
3
4
5
6
7
@Target({ElementType.TYPE}) @Retention(RetentionPolicy.RUNTIME) @Documented @Inherited @SpringBootConfiguration @EnableAutoConfiguration
看看其中的@SpringBootConfiguration
1
2
3
4
5
6
7
8
9
10
11
@Target({ElementType.TYPE}) @Retention(RetentionPolicy.RUNTIME) @Documented @Configuration @Indexed public @interface SpringBootConfiguration {@AliasFor( annotation = Configuration.class ) boolean proxyBeanMethods () default true ;
最后点击@Configuration
1
2
3
4
5
6
7
8
9
10
11
12
@Target({ElementType.TYPE}) @Retention(RetentionPolicy.RUNTIME) @Documented @Component public @interface Configuration {@AliasFor( annotation = Component.class ) value () default "" ;boolean proxyBeanMethods () default true ;
发现它是一个@Component,所以主类本身是spring的一个组件
再看看pom.xml
1 2 3 4 5 6 7 8 9 10 11 12 13 14 15 16 17 18 19 20 21 <dependency > <groupId > org.springframework.boot</groupId > <artifactId > spring-boot-starter-web</artifactId > </dependency > <dependency > <groupId > org.springframework.boot</groupId > <artifactId > spring-boot-starter-test</artifactId > <scope > test</scope > </dependency > <build > <plugins > <plugin > <groupId > org.springframework.boot</groupId > <artifactId > spring-boot-maven-plugin</artifactId > <version > 2.7.3</version > </plugin > </plugins > </build >
双击package,打包项目,在target目录可以找到生成的jar包
看看pom.xml的依赖
spring-boot-starter-web用于实现HTTP接口,使用Tomcat作为默认嵌入式容器,所以我们不需要配置tomcat就能运行springboot项目
修改配置文件 在配置文件application.properties里面配置
在resources文件夹下创建banner.txt
1
2
3
4
5
6
7
_ _ _ _ _ _ _ _ _ _ _ ) _ _ _ _ _ _ | |_ / _ _ | _ _ | |_ _ _ _ _ _ _ | | _ _ _ _ _ | |_ _ \ / _ \ / _ \ | _ | \_ _ \ / _ | | ' \ / _ \ / _ \ | | _ | ' \ / -_ ) | _ | _ _ _ / \_ _ _ / \_ _ _ / _ \_ _ | |_ _ _ / \_ _ |_ |_ ||_ | \_ _ _ / \_ _ _ / _ |_ |_ _ (_ )_ |_ ||_ | \_ _ _ | _ \_ _ | _ |"""""|_ |"""""|_ |"""""|_ |"""""|_ |"""""|_ |"""""|_ |"""""|_ |"""""|_ |"""""|_ |"""""|_ |"""""|_ |"""""|_ |"""""|_ |"""""|
重启项目可以看到控制台中的字符画
修改依赖版本 如果不想要springboot的依赖版本
需要先查看spring-boot-dependencies里面规定当前依赖的版本用的key,比如我们在spring-boot-dependencies-2.7.5.pom里面找到<mysql.version>8.0.31</mysql.version>这一行
然后在<properties>标签里添加配置
1 2 3 <properties > <mysql.version > 5.1.43</mysql.version > </properties >
SpringBoot2特点 依赖管理 开发导入starter场景启动器,(官方约定)spring-boot-starter开头的starter是官方starter,以spring-boot-starter结尾的是第三方的
无需关注版本号,自动版本仲裁
可以修改版本号
自动配置(略) tomcat、springmvc、web常见功能、默认包结构(主程序下的包都能被默认扫描,也可以自定义包目录)、配置默认值、按需加载所有自动配置项……
1
2
3
4
5
6
7
8
9
10
11
12
13
@SpringBootApplication public class Demo2Application {public static void main (String[] args) {ConfigurableApplicationContext run = SpringApplication.run(Demo2Application.class, args);for (String name : names){
底层注解 @Configuration springboot用配置类给容器添加组件,以前是xml配置文件,@Bean注解相当于给容器添加组件
1
2
@Configuration(proxyBeanMethods = true)
@Import 写在组件类上面,用来导入指定组件(类),创建组件并放在容器中,导入的组件名字是包名+类名
1 @Import({User.class, pet.class})
@Conditional 条件装配:满足条件后才会进行组件注入
一个实例:User组件依赖pet组件,在User组件上加一个@ConditionalOnBean(name = "pet"),当容器中有pet组件时,才把User组件放进容器
@ImportResource 自动把beans配置文件里面的组件放到容器里面,因为springboot默认不识别配置文件。
1 @ImportResource("classpath:beans.xml")
@ConfigurationProperties 原来会把数据库账号密码等写到配置文件,再解析给数据库连接池。现在用@ConfigurationProperties和@Component(放在容器中)即可。相当于把类用配置文件中的信息进行初始化
第二种方法,在配置类里面加@EnableConfigurationProperties(Car.class),因为配置类以及在容器中,所以受其庇荫也在容器中
自动配置原理入门 引导加载自动配置类 主要分析@SpringBootApplication中的三个注解
1 2 3 @SpringBootConfiguration @EnableAutoConfiguration @ComponentScan
@SpringBootConfiguration 里面有@Configuration,代表当前是一个配置,说明main程序也是springboot的配置类
@EnableAutoConfiguration(核心) 1 2 @AutoConfigurationPackage @Import({AutoConfigurationImportSelector.class}) {...}
分析@AutoConfigurationPackage @AutoConfigurationPackage自动配置包,里面有
1 2 @Import({AutoConfigurationPackages.Registrar.class}) public @interface AutoConfigurationPackage {...}
@Import给容器导入一个组件,利用AutoConfigurationPackages.Registrar这个组件导入一系列组件
1 2 3 4 5 6 7 static class Registrar implements ImportBeanDefinitionRegistrar , DeterminableImports {public void registerBeanDefinitions (AnnotationMetadata metadata, BeanDefinitionRegistry registry) {new PackageImports (metadata)).getPackageNames().toArray(new String [0 ]));
看AutoConfigurationPackages.register方法,PackageImports(metadata)表示导入元信息,实际上接受Main类的元信息,getPackageNames()表示获得Main类所在包的名字。最后把包名封装到数组里面,把某个包里面的组件导入进来。
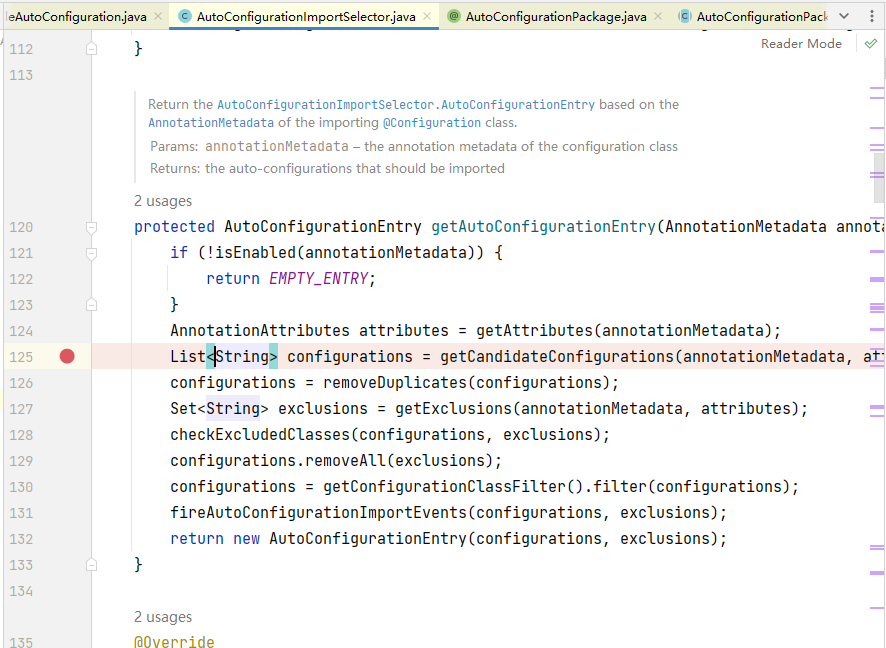
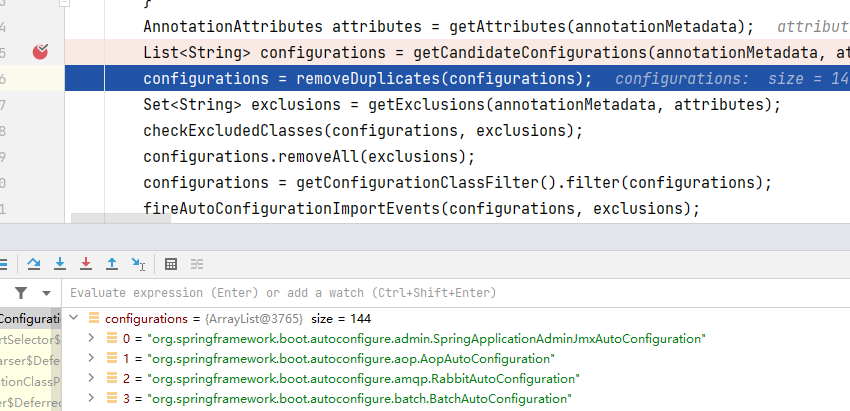
分析@Import({AutoConfigurationImportSelector.class}) 进入AutoConfigurationImportSelector这个类
执行到这句话的下一步,可以看到configurations里面的内容都是类名,这个函数功能是获取所有候选组件
这个函数里面是利用工厂SpringFactoriesLoader.loadFactoryNames(getSpringFactoriesLoaderFactoryClass(), getBeanClassLoader()));->Map<String, List<String>> loadSpringFactories(ClassLoader classLoader)加载,得到所有组件
@ComponentScan(略) 指定扫描哪些
按需开启自动配置项 虽然144个场景默认全部加载,但是最终会按需配置。导入的组件是否生效取决容器是否有其所依赖组件,因为这些组件源代码里面写了@Conditional之类的注解,这就是之前讲这个注解的原因,讲了才知道源代码这个注解有什么用,对组件生效有什么影响
定制化修改自动配置 看看DispatcherServletAutoConfiguration.java里面的几行源代码
1 2 3 4 5 6 7 8 9 @Bean @ConditionalOnBean(MultipartResolver.class) @ConditionalOnMissingBean(name = DispatcherServlet.MULTIPART_RESOLVER_BEAN_NAME) public MultipartResolver multipartResolver (MultipartResolver resolver) {return resolver;
总结
springboot默认会在底层配好组件,xxxAutoConfiguration导进来
每个自动配置类按照条件进行生效,默认会绑定配置文件里面的值,从xxxProperties里面拿默认值,xxxProperties又和配置文件进行了绑定
生效的配置类就会给容器中装配很多组件
只要容器中有这些组件,相当于这些功能就有了
定制化配置:用户直接@Bean替换底层的组件,用户去看组件是获得的配置文件的什么值就直接去改
开发技巧 如何编写springboot应用
Lombok简化开发(略) Spring Initailizr(略) 配置文件 properties(略) yaml 标记语言,适合以数据为中心的配置文件
下面是一个实例
先创建一个bean包,里面创建一个Person类
1 2 3 4 5 6 7 8 9 10 11 12 13 14 15 16 17 18 19 20 21 22 23 24 25 26 27 28 29 package com.example.demo.bean;import lombok.Data;import lombok.ToString;import org.springframework.boot.context.properties.ConfigurationProperties;import org.springframework.stereotype.Component;import java.util.Date;import java.util.List;import java.util.Map;import java.util.Set;@ConfigurationProperties(prefix = "person") @Component @ToString @Data public class Person {private String userName;private Boolean boss;private Date birth;private Integer age;private Pet pet;private String[] interests;private List<String> animal;private Map<String, Object> score;private Set<Double> salarys;private Map<String, List<Pet>> allPets;
再创建一个Pet类
1 2 3 4 5 6 7 8 9 10 11 12 package com.example.demo.bean;import lombok.Data;import lombok.ToString;@ToString @Data public class Pet {private String name;private Double weight;
在resources文件夹下创建application.yml
1 2 3 4 5 6 7 8 9 10 11 12 13 14 15 16 17 18 19 20 21 22 23 24 25 person: userName: zhangsan boss: false birth: 2019 /12/12 20 :12:33 age: 18 pet: name: tomcat weight: 23.4 interests: [篮球 ,游泳 ]animal: - jerry - mario score: english: first: 30 second: 40 third: 50 math: [131 ,140 ,148 ]chinese: {first: 128 ,second: 136 }salarys: [3999 ,4999.98 ,5999.99 ]allPets: sick: - {name: tom }- {name: jerry ,weight: 47 }health: [{name: mario ,weight: 47 }]
创建一个控制器
1 2 3 4 5 6 7 8 9 10 11 12 13 14 15 16 17 package com.example.demo.controller;import com.example.demo.bean.Person;import org.springframework.beans.factory.annotation.Autowired;import org.springframework.web.bind.annotation.RequestMapping;import org.springframework.web.bind.annotation.RestController;@RestController public class HelloController {@Autowired @RequestMapping("/person") public Person person () {return person;
单引号会将\n做完字符串输出,双引号会将\n作为换行
自定义类绑定的配置提示 pom.xml导入依赖即可
1 2 3 4 5 <dependency > <groupId > org.springframework.boot</groupId > <artifactId > spring-boot-configuration-processor</artifactId > <optional > true</optional > </dependency >
注意userName它会提示成user-name,这两个写法都可以
打包的时候要把这个包排除掉,在pom.xml配置如下
1 2 3 4 5 6 7 8 9 10 11 12 13 14 15 16 17 18 <build > <plugins > <plugin > <groupId > org.springframework.boot</groupId > <artifactId > spring-boot-maven-plugin</artifactId > <version > 2.7.3</version > <configuration > <excludes > <exclude > <groupId > org.springframework.boot</groupId > <artifactId > spring-boot-configuration-processor</artifactId > </exclude > </excludes > </configuration > </plugin > </plugins > </build >
Web场景 静态资源管理规则与定制化 静态资源目录 只要静态资源放在resources下的这些目录都可以访问
public
static
resources(和父目录同名)
META-INF/resources
原理:先找controller处理请求,不能处理的请求交给静态资源处理器
静态资源访问前缀 默认无前缀
1 2 3 spring: mvc: static-path-pattern: /res/**
当前项目+static-path-pattern+静态资源名称=静态文件夹下找
欢迎页支持(略) 第一种:静态资源路径下index.html
第二种:controller处理/index
自定义网站标签页图标 把favicon.ico文件放在静态资源文件夹,禁用浏览器缓存即可看见
静态资源原理 原理研究步骤
SpringBoot启动默认加载xxxAutoConfiguration类(自动配置类)
进入xxx功能的自动配置类xxxAutoConfiguration
看这个自动配置类里面有什么内置类
看其涉及的配置文件相关属性
HandlerMapping(处理器映射)保存了每一个Handler能处理哪些请求,老板分配任务,springmvc里面学过
请求处理 Rest请求映射 核心Filter:HiddenHttpMethodFilter
根据HiddenHttpMethodFilter.java源代码,需要delete方法提交需要添加一个隐藏参数。
1 2 3 4 <form action ="/user" method ="post" > <input name ="_method" type ="hidden" value ="DELETE" /> <input value ="DELETE提交" type ="submit" /> </form >
看一下HiddenHttpMethodFilter.java源代码,里面有
1 2 3 4 5 6 7 8 9 10 11 private static class HttpMethodRequestWrapper extends HttpServletRequestWrapper {private final String method;public HttpMethodRequestWrapper (HttpServletRequest request, String method) {super (request);this .method = method;@Override public String getMethod () {return this .method;
HttpServletRequestWrapper本质是servlet,其中的HttpMethodRequestWrapper方法修改了method变量
再看另外一个方法
1 2 3 4 5 6 7 8 9 10 11 12 13 14 15 16 17 18 19 20 21 @Override protected void doFilterInternal (HttpServletRequest request, HttpServletResponse response, FilterChain filterChain) throws ServletException, IOException {HttpServletRequest requestToUse = request;if ("POST" .equals(request.getMethod()) && request.getAttribute(WebUtils.ERROR_EXCEPTION_ATTRIBUTE) == null ) {String paramValue = request.getParameter(this .methodParam);if (StringUtils.hasLength(paramValue)) {String method = paramValue.toUpperCase(Locale.ENGLISH);if (ALLOWED_METHODS.contains(method)) {new HttpMethodRequestWrapper (request, method);
根据该类的这两行源代码可知
1 2 public static final String DEFAULT_METHOD_PARAM = "_method" ;private String methodParam = DEFAULT_METHOD_PARAM;
methodParam即为"_method",所以我们要传这个参数才能DELETE什么的。Filter放行的是HttpMethodRequestWrapper而不是HttpServletRequest,以后调用的getMethod是调用HttpMethodRequestWrapper的。
直接DELETE发包还是不用参数的,这里指的是html表单的方式
请求映射原理 SpringMVC功能分析都要从doDispatch()方法分析
1 2 3 4 5 6 7 8 9 10 11 12 13 14 15 16 17 18 19 20 21 22 23 24 25 26 27 28 29 30 31 32 33 34 35 36 37 38 39 40 41 42 43 44 45 46 47 48 49 50 51 52 53 54 55 56 57 58 59 60 61 62 63 64 65 66 67 68 69 70 71 72 73 74 75 76 77 78 79 80 81 protected void doDispatch (HttpServletRequest request, HttpServletResponse response) throws Exception {HttpServletRequest processedRequest = request;HandlerExecutionChain mappedHandler = null ;boolean multipartRequestParsed = false ;WebAsyncManager asyncManager = WebAsyncUtils.getAsyncManager(request);try {ModelAndView mv = null ;Exception dispatchException = null ;try {if (mappedHandler == null ) {return ;HandlerAdapter ha = getHandlerAdapter(mappedHandler.getHandler());String method = request.getMethod();boolean isGet = HttpMethod.GET.matches(method);if (isGet || HttpMethod.HEAD.matches(method)) {long lastModified = ha.getLastModified(request, mappedHandler.getHandler());if (new ServletWebRequest (request, response).checkNotModified(lastModified) && isGet) {return ;if (!mappedHandler.applyPreHandle(processedRequest, response)) {return ;if (asyncManager.isConcurrentHandlingStarted()) {return ;catch (Exception ex) {catch (Throwable err) {new NestedServletException ("Handler dispatch failed" , err);catch (Exception ex) {catch (Throwable err) {new NestedServletException ("Handler processing failed" , err));finally {if (asyncManager.isConcurrentHandlingStarted()) {if (mappedHandler != null ) {else {if (multipartRequestParsed) {
下面这行可以获得处理器
1 mappedHandler = getHandler(processedRequest);
进去看看
1 2 3 4 5 6 7 8 9 10 11 12 @Nullable protected HandlerExecutionChain getHandler (HttpServletRequest request) throws Exception {if (this .handlerMappings != null ) {for (HandlerMapping mapping : this .handlerMappings) {HandlerExecutionChain handler = mapping.getHandler(request);if (handler != null ) {return handler;return null ;
下面这个可以获得请求类,这个HandlerExecutionChain在springmvc提到过
1 HandlerExecutionChain handler = mapping.getHandler(request);
WebMvcConfigurationSupport.java中自动配置了RequestMappingHandlerMapping,体现了springboot中有注解标记的处理器不用配置处理器的原因
1 2 3 4 public RequestMappingHandlerMapping requestMappingHandlerMapping ( @Qualifier("mvcContentNegotiationManager") ContentNegotiationManager contentNegotiationManager, @Qualifier("mvcConversionService") FormattingConversionService conversionService, @Qualifier("mvcResourceUrlProvider") ResourceUrlProvider resourceUrlProvider) {......
常用注解使用 1 2 3 4 5 6 7 8 9 10 11 12 13 14 15 16 17 18 19 20 21 22 23 24 25 26 27 28 29 30 31 32 33 34 @RestController public class TestController {@GetMapping("/cat/{id}/owner/{username}") public Map<String, Object> getCar (@PathVariable("id") Integer id, @PathVariable("username") String name, @PathVariable Map<String, String> pv, @RequestHeader("User-Agent") String userAgent, @RequestHeader Map<String, String> header, @RequestParam("age") Integer age, @RequestParam("inters") List<String> inters, @RequestHeader Map<String, String> params, @CookieValue("_ga") String _ga, @CookieValue("_ga") Cookie cookie) {new HashMap <>();"id" , id);"name" , name);"pv" , pv);"userAgent" , userAgent);"headers" , header);"age" , age);"inters" , inters);"params" , params);"_ga" , _ga);"==>" +cookie.getValue());return map;@PostMapping("/save") public Map postMethod (@RequestBody String content) {new HashMap <>();"content" , content);return map;
1 2 3 4 5 6 7 8 9 10 11 12 13 14 15 16 17 18 19 20 21 22 @Controller public class RequestController {@GetMapping("/goto") public String goToPage (HttpServletRequest request) "msg" , "成功" );"code" , 200 );return "forward:/success" ;@ResponseBody @GetMapping("/success") public Map success (@RequestAttribute("msg") String msg, @RequestAttribute("code") Integer code, HttpServletRequest request) {Object msg1 = request.getAttribute("msg" );new HashMap <>();"reqMethod_msg" , msg1);"annotation_msg" , msg);return map;
@MatrixVariable使用方法略
各种类型参数解析原理 从DispatcherServlet.java开始分析
1 mv = ha.handle(processedRequest, response, mappedHandler.getHandler());
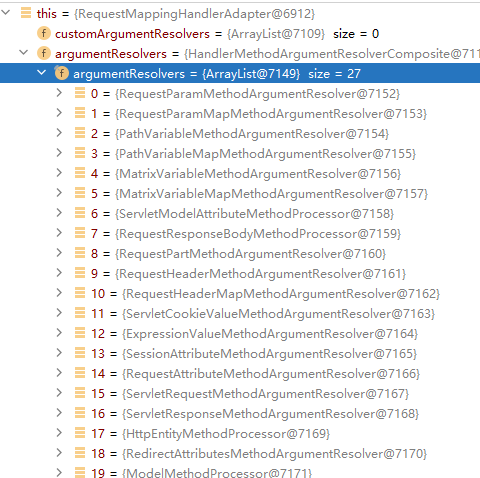
在目标方法执行前会设置argumentResolvers参数解析器来确定将要执行的目标方法的每一个参数值是多少
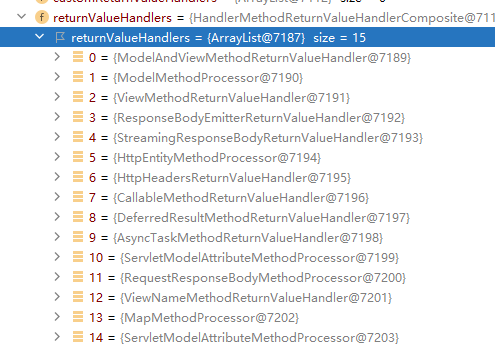
returnValueHandlers返回值处理器确定控制器能return哪些类型
执行方法
1 invocableMethod.invokeAndHandle(webRequest, mavContainer);
进去又有一个函数
1 Object returnValue = invokeForRequest(webRequest, mavContainer, providedArgs);
这个方法执行完会跳到我们写的控制器处
进去看看这个方法
获得方法参数的值
1 Object[] args = getMethodArgumentValues(request, mavContainer, providedArgs);
进去看看
1 MethodParameter[] parameters = getMethodParameters();
1 2 3 4 5 6 7 8 9 10 11 12 13 14 15 16 17 18 19 20 21 22 23 24 25 26 27 28 29 30 31 32 33 34 35 36 37 38 39 protected Object[] getMethodArgumentValues(NativeWebRequest request, @Nullable ModelAndViewContainer mavContainer,throws Exception {if (ObjectUtils.isEmpty(parameters)) {return EMPTY_ARGS;new Object [parameters.length];for (int i = 0 ; i < parameters.length; i++) {MethodParameter parameter = parameters[i];this .parameterNameDiscoverer);if (args[i] != null ) {continue ;if (!this .resolvers.supportsParameter(parameter)) {throw new IllegalStateException (formatArgumentError(parameter, "No suitable resolver" ));try {this .resolvers.resolveArgument(parameter, mavContainer, request, this .dataBinderFactory);catch (Exception ex) {if (logger.isDebugEnabled()) {String exMsg = ex.getMessage();if (exMsg != null && !exMsg.contains(parameter.getExecutable().toGenericString())) {throw ex;return args;
进去this.resolvers.supportsParameter(parameter)
1 2 3 4 5 6 7 8 9 10 11 12 13 14 15 16 17 @Nullable private HandlerMethodArgumentResolver getArgumentResolver (MethodParameter parameter) {HandlerMethodArgumentResolver result = this .argumentResolverCache.get(parameter);if (result == null ) {for (HandlerMethodArgumentResolver resolver : this .argumentResolvers) {if (resolver.supportsParameter(parameter)) {this .argumentResolverCache.put(parameter, result);break ;return result;
进去args[i] = this.resolvers.resolveArgument(parameter, mavContainer, request, this.dataBinderFactory);里面,进入return resolver.resolveArgument(parameter, mavContainer, webRequest, binderFactory);里面具体不写了
就是把我们请求传入的参数和控制器里面的参数遍历查找匹配,就是这个思路
Servlet API参数解析原理 上面说resolver.supportsParameter(parameter)是处理参数的。每个注解或者正常的参数都有自己的supportsParameter()方法。
下面是RequestParamMethodArgumentResolver类里面的supportsParameter()
1 2 3 4 5 6 7 8 9 10 11 12 13 14 15 public boolean supportsParameter (MethodParameter parameter) {return (WebRequest.class.isAssignableFrom(paramType) ||null && pushBuilder.isAssignableFrom(paramType)) ||
下面这个例子参数为HttpServletRequest类
1 2 3 4 5 6 7 @GetMapping("/goto") public String goToPage (HttpServletRequest request) "msg" , "成功" );"code" , 200 );return "forward:/success" ;
满足上面supportsParameter()的第二个条件ServletRequest.class.isAssignableFrom(paramType),说明支持解析
然后看看如何解析
它主要是通过NativeWebRequest类的getNativeRequest方法获得原生请求
1 webRequest.getNativeRequest(requiredType);
用HttpServletRequest类把原生请求包装起来
Model、Map原理 前面是一样的,判断当前参数解析器是否支持参数类型然后解析参数
不同的是解析参数的过程,在里面无论是Model还是Map类型都会调用maxContainer.getModel()返回一个BindingAwareModelMap类型
模型是货物,视图是目的地
目标方法执行完成会将所有的数据放在ModelAndViewContainer这个类的对象里面
当我们转发Map或者Model时,可以一直跟踪源代码,发现在InternalResourceView类的renderMergedOutputModel方法中的exposeModelAsRequestAttributes方法中可以看到它是怎么处理转发 的
1 2 3 4 5 6 7 8 9 10 11 12 protected void exposeModelAsRequestAttributes (Map<String, Object> model, HttpServletRequest request) throws Exception {if (value != null ) {else {
就是遍历调用setAttribute方法存储键值对
自定义参数原理 首先创建两个自定义类
1 2 3 4 5 6 7 8 9 package com.example.demo.bean;import lombok.Data;@Data public class Student {private String name;private Integer age;private Pet pet;
1 2 3 4 5 6 7 8 9 package com.example.demo.bean;import lombok.Data;import lombok.ToString;@ToString @Data public class Pet {private String name;private Integer age;
写一个控制器
1 2 3 4 5 6 7 @RestController public class HelloController {@PostMapping("/student") public Student Stu (Student student) {return student;
写一个提交表单
1 2 3 4 5 6 7 8 9 10 11 12 13 14 15 16 <!DOCTYPE html > <html lang ="en" > <head > <meta charset ="UTF-8" > <title > Title</title > </head > <body > <form action ="/student" method ="post" > <input name ="name" value ="achilles" > <br /> <input name ="age" value ="10" > <br /> <input name ="pet.name" value ="ach" > <br /> <input name ="pet.age" value ="2" > <br /> <input type ="submit" value ="提交" > </form > </body > </html >
发送请求后可以看到json结果
研究提交的参数内容和对象如何绑定
前面也都是一样的
调试后发现在getArgumentResolver方法处理过程中,找到了支持自定义类型 的参数解析器 ServletModelAttributeMethodProcessor
后面的过程粗略记录一下:把请求的数据拿到,因为http协议传输的都是String,最后需要用对应的converter转一下类型,比如先把数据转换成整数再赋值给age
自定义converter